
Overview
Below is an outline of the steps necessary to complete a new installation of Critical Labs. Each line item is detailed in the sections below.
- Project Admin
- Setup and Install Gateway
- Setup and Install Standalone Sensors
- Connect Devices to Critical Labs
- Setup Views
- Setup Users, Alerts, and Permissions
- Provide Customer Training
Project Admin
- Walk through the On-boarding Pre-Requisites document with your customer: https://criticallabs.zendesk.com/hc/en-us/articles/360004128433-Onboarding-Pre-Requisites
- The customer will need to setup firewall rules for the gateway if they have a firewall: https://criticallabs.zendesk.com/hc/en-us/articles/360003163893-Setting-up-Firewalls-for-Critical-Labs-Gateways
- Work with your customer to complete a Site Survey found within the partner portal.
- Determine if devices need to be ordered and coordinate installation with your customer. Some devices may require a 3rd party for installation/configuration.
- Submit your Order through the Partner Portal.
- The Critical Labs team will send you a preconfigured gateway with the Critical Labs software already installed and give you access to manage the new customer from the cloud at www.criticallabs.com
- If you have not already set up an account, check for an invite email from Critical Labs. Follow the invite link to set up your account.
Setup and Install Gateway
- Verify that the Site Survey has been filled out and that it has all of the information needed.
- Set up the gateway in the cloud
- Navigate to www.criticallabs.com
- Select the customer
- Select the navigation menu in the top right corner (the 3 dots) and choose “My Equipment”

- On the “My Equipment” page, select the plus (+) button to the right of the “Select A Gateway” header.

- Enter the Gateway ID and Key that were provided to you by the Critical Labs team, along with a unique name for the gateway. A good format for the gateway name is to include the customer name and the site where the gateway is installed. For example: “Critical Labs Downtown Omaha Gateway”. Leave the poll interval at the default 300 seconds. Then click “Save”.

- *Optional Step*: It is highly recommended that you setup a customer's gateway to use either a static IP address or a reserved DHCP address. This will prevent the gateway from changing IP addresses if it loses power. The gateway is set to DHCP by default.
- To set up a static IP address, follow the steps below:
- Plug in the gateway on your network and wait 5-10 minutes for the gateway to start up.
- You will need to find the IP address of the gateway on your network. In order to do this, you can navigate to www.criticallabs.com, select the customer, select “My Equipment” from the navigation menu and then select the gateway. Once the gateway has connected to the cloud, it will display its IP address on the gateway page. *Another option is to use a network scanning tool and search for the gateway’s MAC address which can be found on a sticker on the device.

- From your PC, open a web browser and open the gateway web interface by entering the gateway’s IP address plus port 9001, for example: http://192.168.0.10:9001.
- Navigate to the menu in the top right-hand corner and select ‘Network Settings’

- You will be prompted to enter a username and password. Use the username and password provided when you received the gateway.
- Fill out the form fields and select the ‘Use Static’ button to save the configuration. *Note* Please make sure everything is correct before saving, incorrect configuration can make the gateway nearly unreachable on the network and may require a complete reinstallation. *If you have accidentally configured the wrong settings for this device, use this document for help resetting the gateway to DHCP: https://criticallabs.zendesk.com/hc/en-us/articles/360019372594-Using-the-Gateway-User-Interface.

- After saving the settings, the gateway will automatically reboot with the new configuration.
- To setup a reserved DHCP address, contact your customer's network team and ask that they reserve an IP address for the Critical Labs gateway
- To set up a static IP address, follow the steps below:
- Verify that the customer has completed the necessary network and firewall configuration referenced above and has a PoE port or the optional power supply for the gateway.
- Install the Gateway on the customer site
- Plug the ethernet cord into the gateway. For non-PoE installations, also plug in the power supply.
- Verify that the gateway is connected and running by navigating to the gateway page at www.criticallabs.com. *It may take the gateway up to 5-10 minutes after it is plugged in to show a successful connection to the cloud.
- Navigate to www.criticallabs.com
- Select the customer
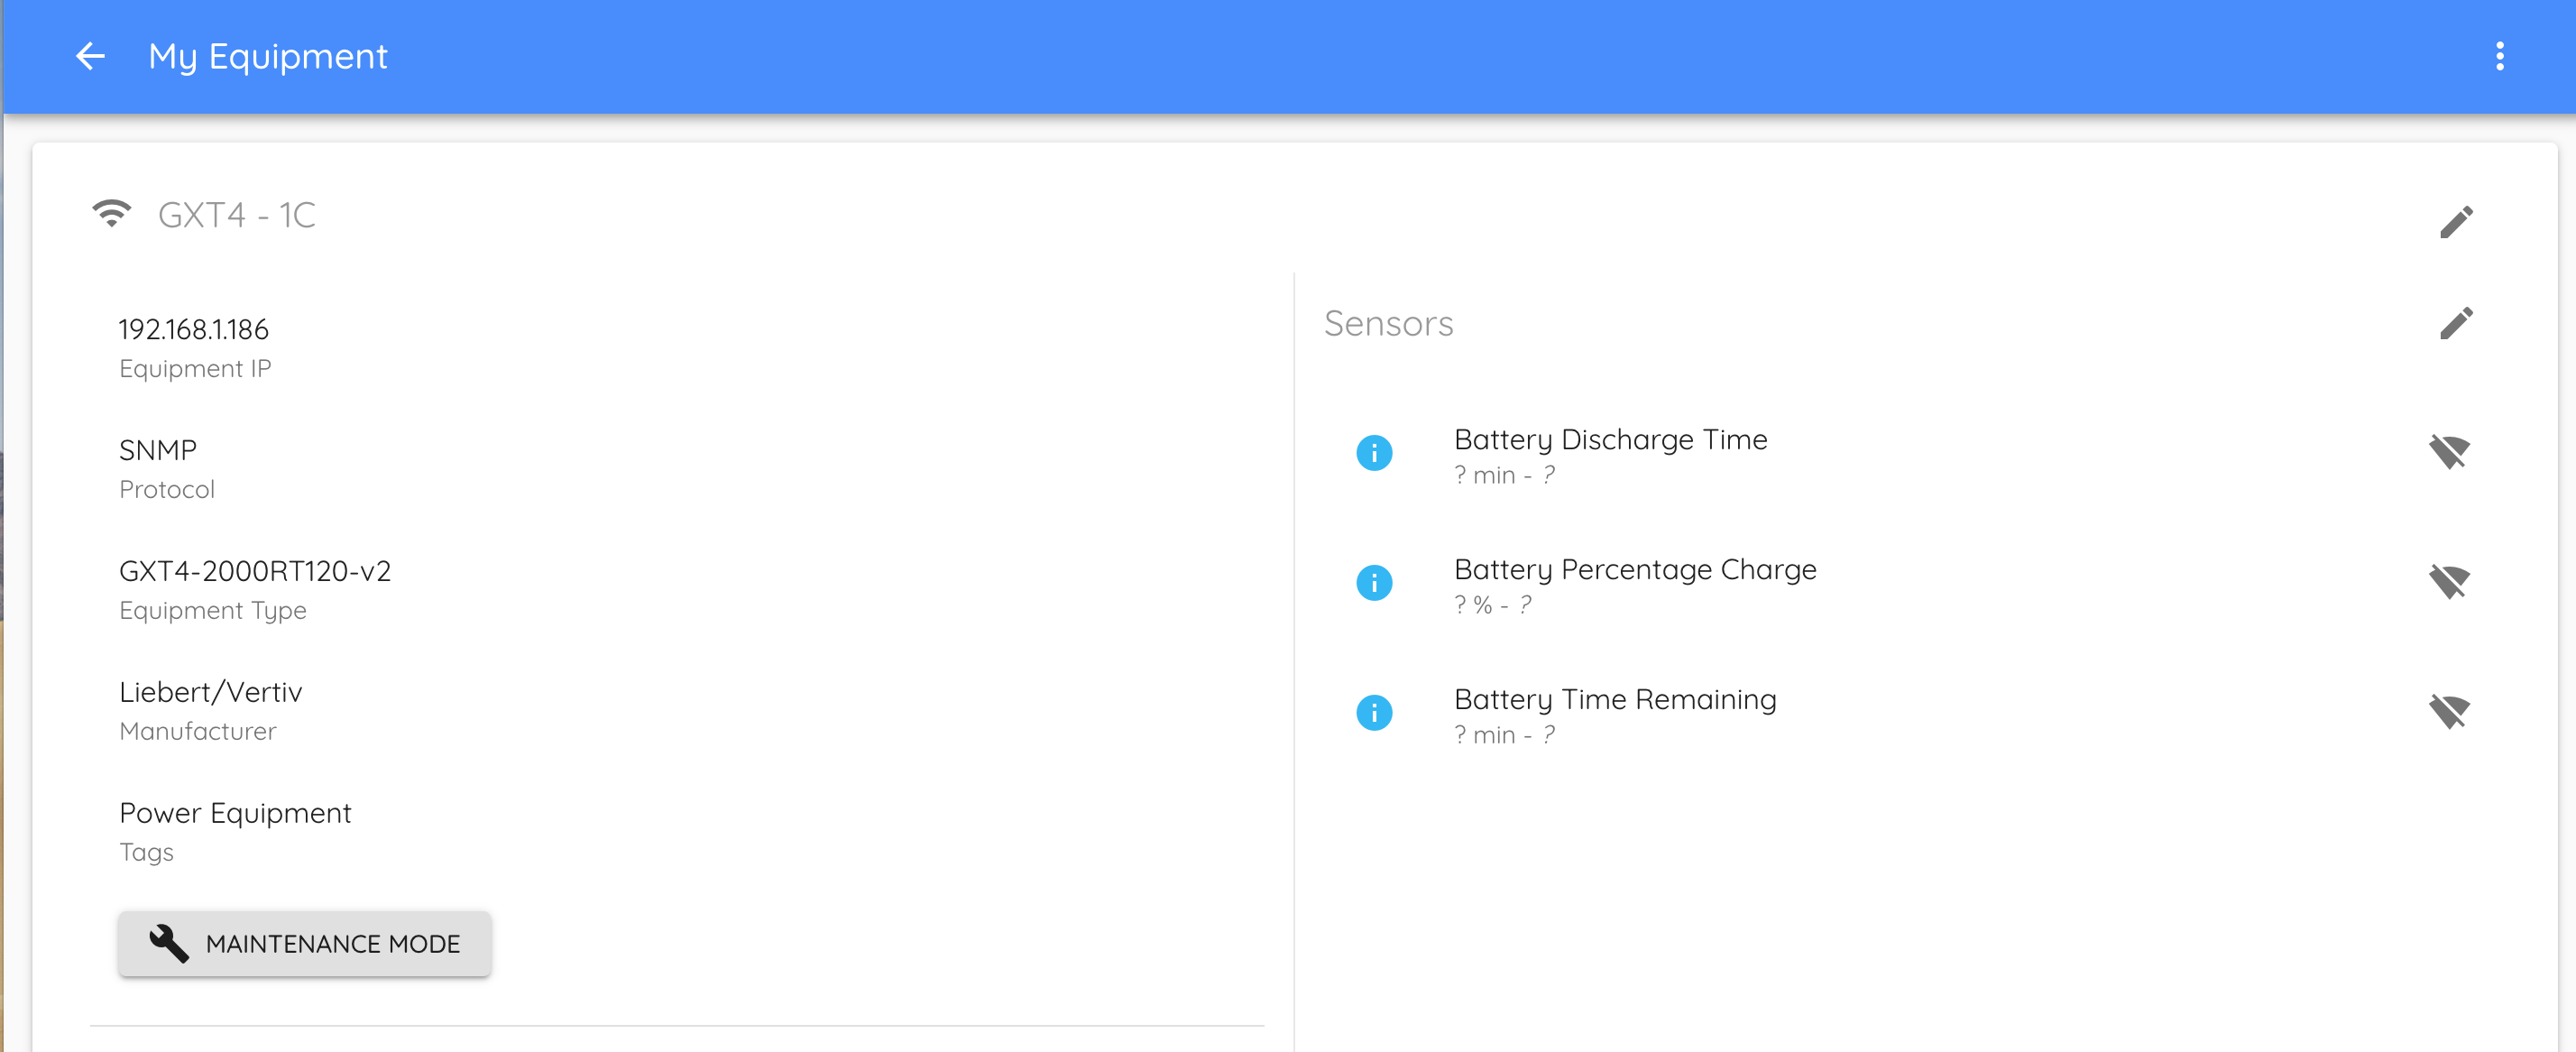
- Select the menu at the top right-hand corner of the page and choose “My Equipment”
- Select the gateway
- Watch the “Next Poll” field in the bottom left corner of the gateway page and wait for it to update the timestamp. We recommend waiting for at least 2 consecutive polls before considering it a successful installation.

Setup and Install Standalone Sensors
- If the installation includes standalone sensors such as temperature and humidity sensors, they will need to be configured before installing them onsite. You will find a section of articles provided by Critical Labs to help assist you in this process here.
- Once the devices have been configured, coordinate installation with the customer.
Connect Devices to Critical Labs
- Once you have verified that all devices have been installed and configured onsite, you can start connecting the devices to Critical Labs.
- To add a new equipment, go to www.criticallabs.com, select the customer, and then select the navigation menu at the top right of the page and select “My Equipment” and select the gateway.
- There are 2 ways to add devices in Critical Labs. Manually or by using our auto-discovery feature. Auto-discovery is recommended when available as it will attempt to automatically match the device to a pre-built library and template.
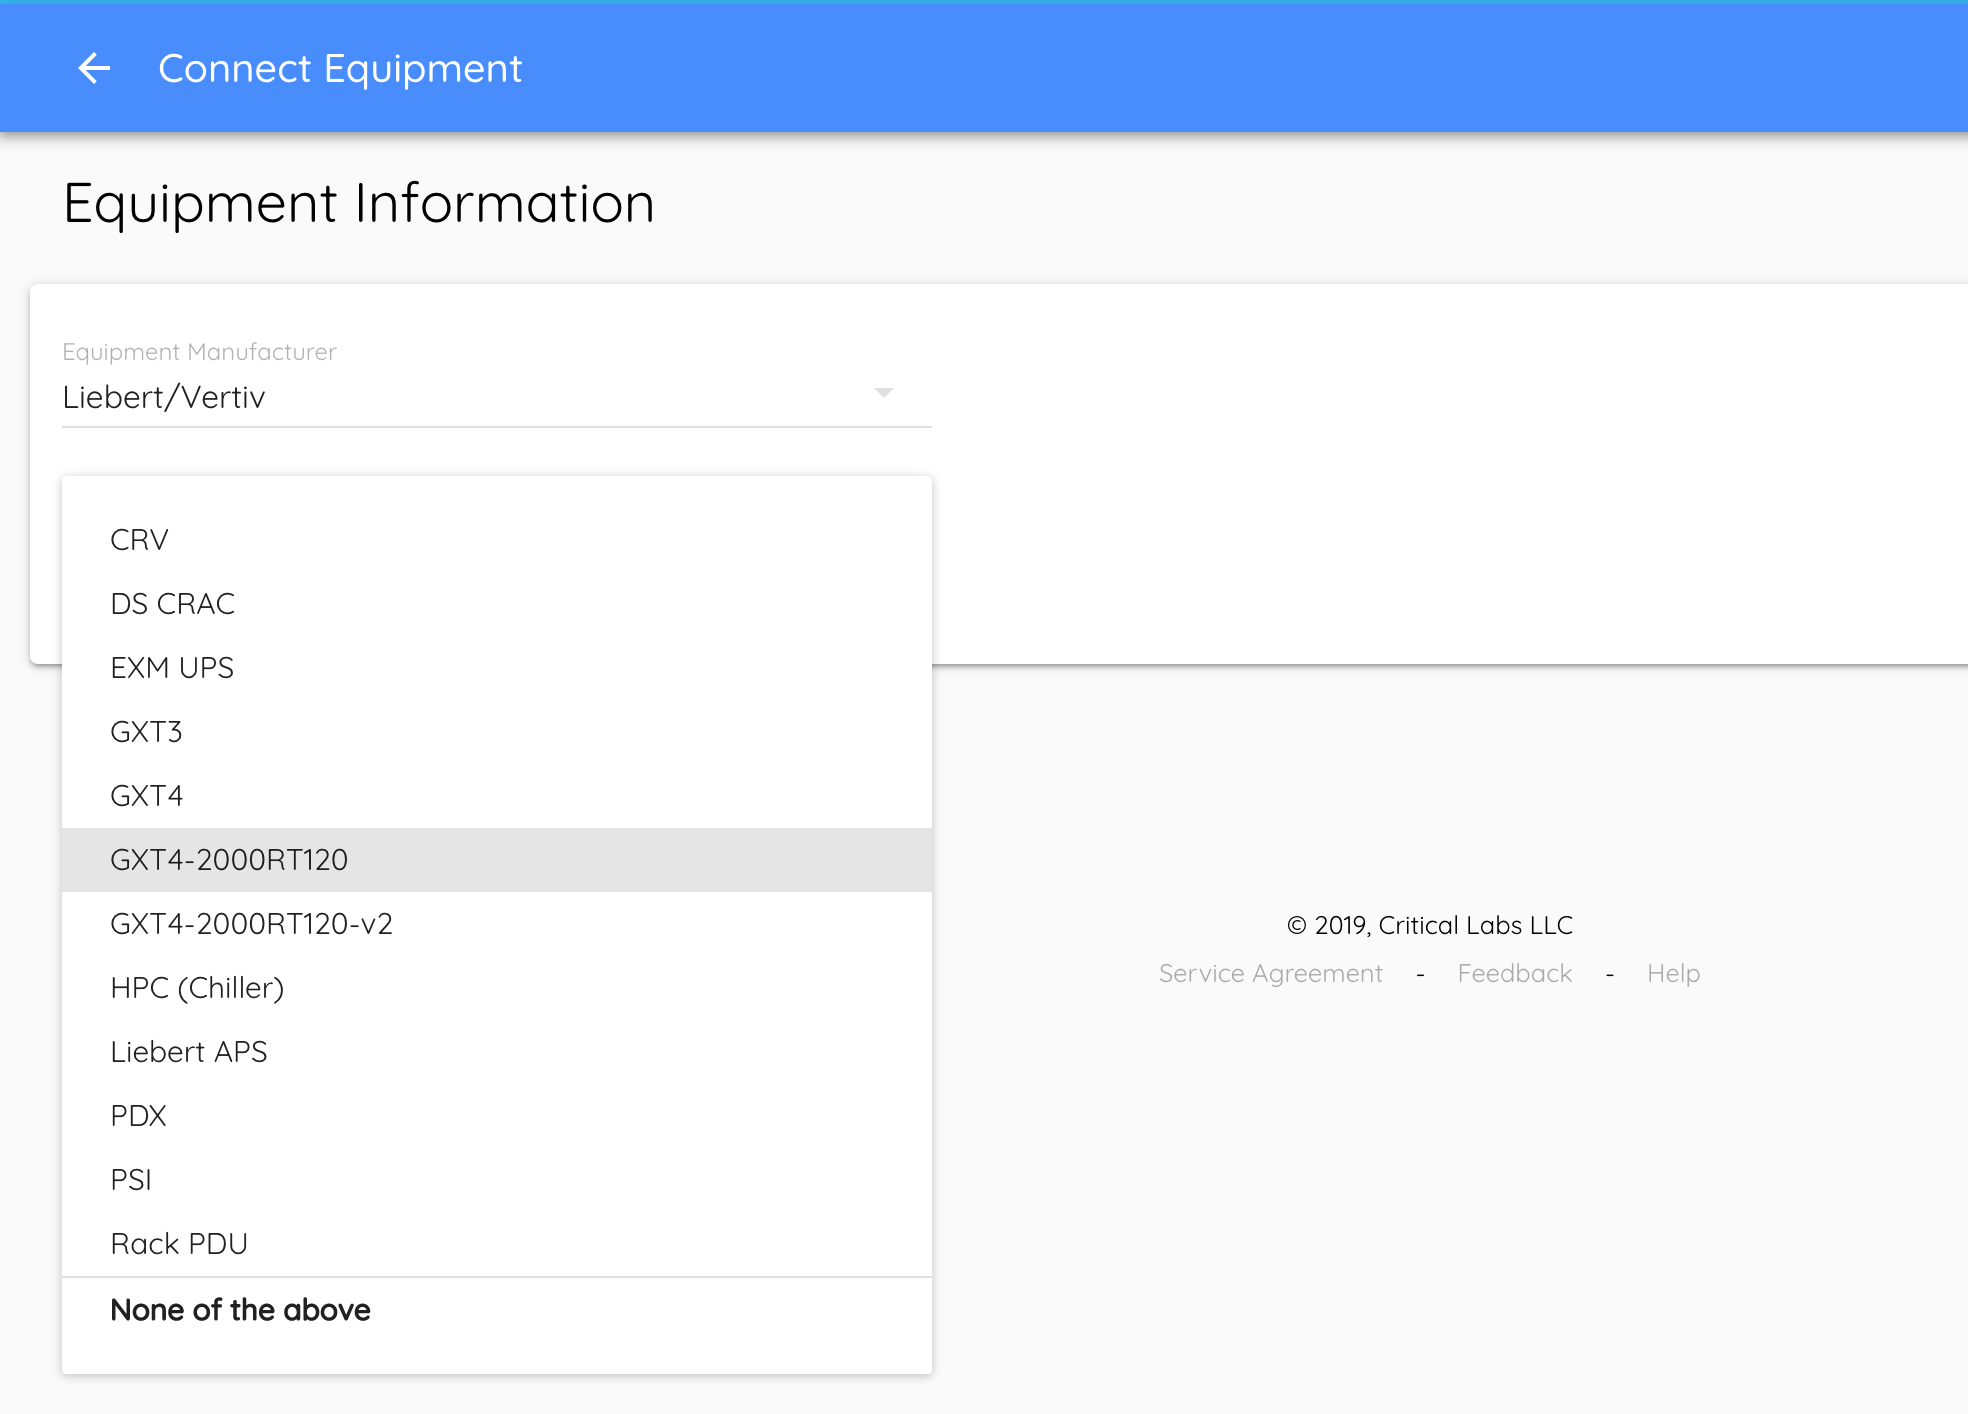
- To manually add devices, select the plus (+) button to the right of the “Equipment” header.
- You will be prompted to select a Manufacturer and Model for the equipment. If they don’t exist yet you will need to create a new library for the equipment. To create a new library, select “None of the above” in the “Equipment Model” drop down list. The application will walk you through the steps to create the library. For more information, you can reference these documents on creating libraries:
- Once you have selected the Manufacturer and Model, use the information contained in the Site Survey to fill in the rest of the information.
- Some equipment has an option to select a "View Template". This is a predefined view made by Critical Labs. We recommend selecting a View Template when it is available. It saves you from having to build a view from scratch.

- If there is no View Template, click “Save” and you will be taken to the “Add Sensors” page. This is where you select all the sensors that you would like to monitor. Once you have finished selecting the sensors (these can be updated later), click “Finish” and you will be taken to the newly created Equipment page. The gateway will report readings for the equipment on the next poll.
- If there was a View Template, the sensors will automatically be added and you will be taken to the newly created view’s screen.
- Some equipment has an option to select a "View Template". This is a predefined view made by Critical Labs. We recommend selecting a View Template when it is available. It saves you from having to build a view from scratch.
- Validate that the equipment has connected to the gateway and is reporting data. If the equipment cannot connect, it will show a disconnected icon in the top left corner of the page next to its name. The sensors will also show the disconnected icon and will have a question mark for the reading value. *Note: you may need to refresh the page to update the status of the equipment. If the equipment or an individual sensor is not reporting correctly, you may use the following document as a guide to help resolve the issue: (coming soon)
- Repeat this process for each piece of equipment.
Setup Views
- Create a view for each piece of equipment and optionally add a main dashboard containing an overview of the whole system using the following documents as a guide: https://criticallabs.zendesk.com/hc/en-us/articles/360015431134-My-Views-and-View-Templates-User-Guide
Setup Users, Permissions, and Alerts
- To add a new user, go to www.criticallabs.com, select the customer, and then select the navigation menu at the top right of the page and select “Users”.
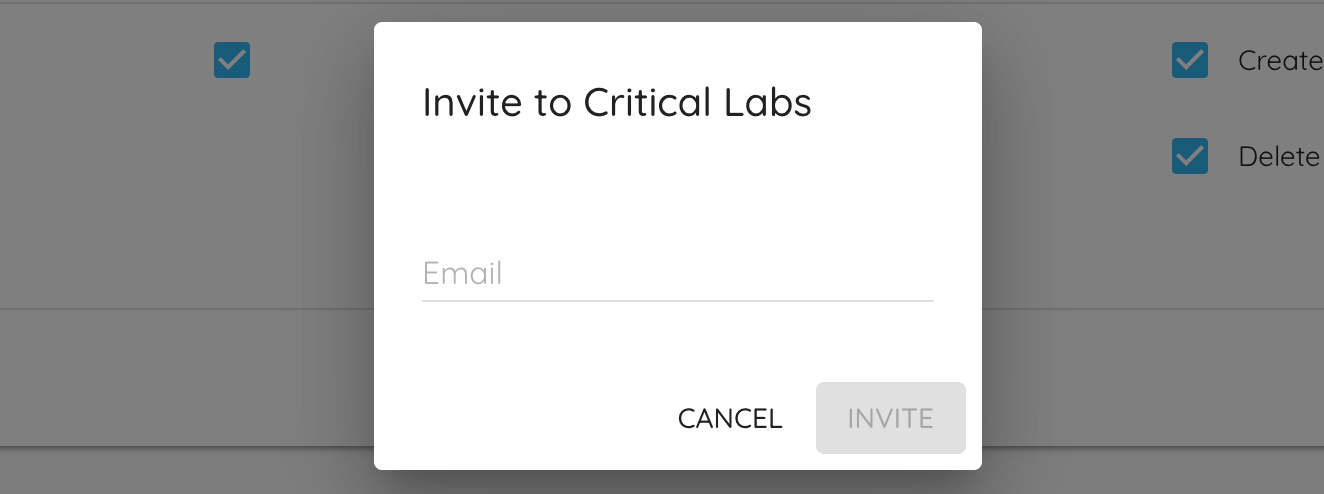
- Select the plus (+) button on the right side of the page and a dialog box will appear that prompts you for an email. Enter the email of the person you would like to grant access to. This person will receive an email that allows them to set up their profile and gain access to www.criticallabs.com.
- Once you have sent the email invite, you can select the appropriate permissions to grant to that person. These include things like the ability to manage users and creating or deleting templates and libraries.

- At this time, you may also specify which alerts the user should receive.
- Select the button at the far right of the user’s row and you will be given a list of permissions/alerts for each view. The first tab will allow you to give granular permissions on each view that will allow the user to read, edit, or share the view.

- Select the “Alerts” tab at the top of the dialog box to specify which types of alerts the user should receive from each view.

- Click “Save” when finished.
- Select the button at the far right of the user’s row and you will be given a list of permissions/alerts for each view. The first tab will allow you to give granular permissions on each view that will allow the user to read, edit, or share the view.
- Repeat this process for each individual that you would like to grant access to.
- Verify that the user's received their invite emails and were able to set up their accounts. You can re-send an invitation if necessary from the Users page by selecting the "Resend Invite" button.

Provide Customer Training
- Provide the customer with our training guide located here: https://criticallabs.zendesk.com/hc/en-us/categories/360002421774-Training
- We will also schedule a ~1 hour screen share session to provide a walk-through of Critical Labs and answer questions.
Comments
0 comments
Article is closed for comments.